Tuesday, February 14, 2012

the joy of soy (milk)

I decided to temporarily go dairy-free about 3 months ago.  That would explain why my pantry currently houses hazelnut milk, almond milk, and soy milk.  The hazelnut milk I purchased is my favorite because it is roasted and creamy compared to the other nut milks.  I'm not a big fan of commercial almond or soy milk as they tend to be one dimensional, diluted, and have an unpleasant raw taste.  I figure now is a good a time as any to dust off that old knowledge of soy milk making.  I would guess that hazelnut and almond milk are made in a similar fashion.  Aside from cooking the soy milk on the stove instead of of steaming it, this is how my mom taught me to make soy milk.

Mmm...fresh soy milk!

Grass Jelly

Soy milk with Grass Jelly

Homemade Soy Milk
Yields:  Approximately 2 1/2 gallons

2 lbs dried soybeans
2 1/2 gallons or more of cold water
3 or more cups of sugar
a large strainer
a large muslin bag
a wooden spoon
2 large stock pots that will hold over a gallon of liquid

1.  Rinse your soybeans two to three times in cold water.  Add enough water to allow the beans to expand over twice their size.  Allow to soak for at least 8 hours or overnight.
2.  The next day, rinse beans and drain off all the water.
3.  Fill blender bowl with 2 cups of the soybeans.  Add water to about the 4 or 5 cup fill line and blend for 1-2 minutes on high or until your beans are a fine grind.
4.  Over a large stock pot, line your strainer with the muslin bag.  Pour raw soy milk into your clean muslin bag, twisting and squeezing to get all the soy milk out.  Dump out the grind.  Repeat until all the beans have been pulverized.
5.  Heat raw soy milk in stock pots over medium heat until it is cooked, about 1 hour.  Stir occasionally.  Do not allow the soy milk to boil since it could burn.  Add sugar to taste.  You can skim off the stuff on top or re-strain the liquid through your muslin bag if you are concerned about aesthetics.  Once cooled pour into containers and refrigerate.

I remember drinking soymilk with grass jelly as a child.  Grass jelly is similar to the canned jellied cranberry sauce, but black in color.  To me, it has a slightly bitter taste, reminiscent to rooibos tea.  Try to drink it quickly if you use grass jelly or your soymilk will turn an unappetizing gray color. 

Notes:
I think the creamier soy milk tastes so much better, so keep in mind that you can always use less water to make your soy milk.  Use your sense of smell to determine when the soy milk is done.  Soy milk has a raw nut smell at the beginning which is replaced with a different earthier smell as it is heated/cooked.

Monday, February 13, 2012

kickin' kimchi

I tried making kimchi in the past and like many of my creations, was afraid to truly eat it.  I did a little taste test and found it to be pretty good, but threw it out due to a sudden germ phobia.  Weird since I wanted to make kimchi for it's naturally occurring beneficial bacteria.  So I gave it another whirl and once again came up with pretty good kimchi.  It wasn't as tart as I had hoped, so next time I will leave it out on the counter for another day or so before refrigerating it.  It has been sitting in my fridge for over a week now but still hasn't ripened to a desired degree.  I like to eat it with a very salty or slightly sweet and salty meaty dish and rice; something like this Carmelized Shrimp and Pork Belly works good (make sure you open ALL your windows or have great ventilation when cooking with fish sauce...consider yourself forewarned!).

Here is my half gallon of kimchi made from Dr. Ben Kim's recipe. I used the Korean pepper I purchased for my first batch a year or two ago, but it wasn't as brightly colored as in the past due to oxidization from being stored.  It's still good, though.


A close up view of what it looks like.  Pretty authentic, eh?

Kickin' Kimchi
Adapted from Dr. Ben Kim
Yields: About half a gallon

2-3 lb head of Napa cabbage
1/3 cup sea salt, pickling salt, or Kosher salt
Water
1/4 - 1/2 cup fine Korean red chili flakes (do not use regular hot pepper flakes)
1 small daikon radish, sliced into thick matchsticks, optional
1-2 carrots, sliced into thick matchsticks, optional
1-2 tbps minced garlic
1-2 tbsp minced ginger
5-6 green onions, sliced
2 tablespoons anchovy or fish sauce (optional)
1/2 yellow onion
1/2 ripe apple
1/2 ripe pear
 
1. Slice cabbage in half along its length and then chop along the width into 1 1/2 inch bite-size pieces.
2. Dissolve a half cup of salt in a bowl of warm water, then pour salt water over cabbage leaves. Give cabbage a gentle toss to distribute salt water. Allow salted cabbage to sit for at least four hours.
3. Give cabbage a good rinse to remove excess salt, then transfer cabbage to a large bowl.
4. Combine a half cup of fine red chili flakes with warm water, stir gently with a spoon to create a red chili paste, then transfer chili paste to cabbage.
5. Add daikon, carrots, garlic, ginger, green onions, and fish sauce.
6. Blend yellow onion, apple, and pear with one cup of water, then add this natural sweetener to the cabbage.
7. Put on a pair of plastic gloves and give everything a thorough toss and rubdown. You want to evenly distribute all ingredients, especially the red chili paste.
8. Transfer seasoned cabbage leaves into a large glass bottle. Be sure to use firm pressure with your hands to push down on cabbage leaves as they stack up inside the bottle. 

Transfer any liquid that accumulated during the mixing process into the bottle as well - this liquid will become kimchi brine. Some liquid will also come out of the cabbage leaves as you press down on them as they are stacked in the bottle.
 
Be sure to leave about 2 inches of room at the top of the bottle before capping it tightly with a lid. Allow bottle of kimchi to sit at room temperature for 24-48 hours or longer, depending on how warm the room is.  The warmer the environment, the faster the kimchi will ferment.

9. Your kimchi is now ready to eat. Refrigerate and take out portions as needed. The refrigerated kimchi will continue to ferment slowly in the refrigerator over time. So long as you use clean utensils to take out small portions, it will keep for up to a month in your refrigerator.

I didn't add carrots this time, but I will next time.  I also tried making his Cucumber Kim Chi, which came out really good.  Unfortunately, I don't have pictures of it due to camera issues.

Sunday, February 12, 2012

groovy ghee

Just like bacon, ghee makes everything taste better.  Although I am avoiding dairy products, I make an exception for ghee since the finished product doesn't really contain dairy, per se.  If you have not tried ghee melted over white and gold corn (from Target), you have not lived.  I just nuke the corn for a few minutes, then add a large heaping spoon of ghee, freshly ground black pepper, and salt then chow down like there is no tomorrow.  I have been known to eat a large bowl of this for dinner.  It's that good, peeps.  Also a dollop of this in a large mug of mulled cider or hot buttered rum is yummo (spiced buttered cider recipe below)!  I have a bottle sitting on my counter ready to cook or eat with.  Try it and you may never go back to butter again.

Here is a picture of my new batch of ghee with the older batch in the background.  The new batch is still warm and has not had time to solidify yet.  


 Ghee
Yields:  2 cups

1 lb unsalted butter
1 disposable coffee filter

Melt butter in a heavy medium-sized sauce pan over medium heat.  During the first 10-15 minutes, a light foam will rise to the top of the butter.  As it continues to cook, the foam will dissipate.  Let it continue to gently simmer/boil until the butter has turned a golden color and has developed a nutty aroma.  At this point, you should see the milk solids settle to the bottom of the pan.  Keep an eye on this stage as it could easily go from being done to burning (I've done this a couple of times, so I know).  It should take about 30 minutes total to turn the butter to ghee.  Allow to cool.

Line a small strainer with a clean disposable coffee filter and place over a jar that will hold about 16 oz of liquid.  Strain the ghee into the jar.  Cap once ghee is completely cooled.  This should keep for at least a month or more on your counter.


suck up the rum and spit out the cider

We have had a great winter with mild weather that was conducive to shorts and T-shirts.  But the cold weather finally made an appearance, beckoning our inner lushes.  It is perfect weather for hot buttered rum or mulled cider, no?  Something about these hot drinks warm the soul.  Long after the holidays, I am still drinking what I have dubbed "spiced buttered cider".


Spiced Buttered Cider

2 cups premium cider (not from concentrate)
1/4 tsp ground cinnamon
1/8 tsp ground nutmeg
1/8 tsp ground cloves
1 cinnamon stick
2 tbsp ghee or unsalted butter
1 oz dark rum, NOT OPTIONAL...hahaha!
maple syrup, dark brown sugar, amber agave, or orange honey to sweeten, optional
vanilla ice cream or whipped cream, optional

In a small saucepan, heat cider, ground spices, and cinnamon stick.  While cider is heating, pour rum into a thick mug or glass and add ghee.  Stir contents of saucepan, removing from heat before rolling boil, and pour contents into mug.  Add sweetener and/or ice cream or whipped cream.  Bottoms up!  Make sure to drink it while it is still warm.  If you let it cool too much, the butter/ghee will coagulate, which is not appetizing.  If this happens, just reheat in the microwave for a couple of minutes.

Notes:  I am heavy handed on the spices, so please go easy if you've not built up tolerance like I have.  I did not top my cider with vanilla ice cream or whipped cream because I am currently on a dairy-free diet.

Saturday, February 11, 2012

chillin' with chili

I have never liked chili growing up.  It wasn't until this last Christmas when I was with friends at an Old Chicago in Kansas that I finally found a chili worthy of my taste buds.  Wowie!  Thereafter, my search for the perfect chili recipe ensues.  The only chili recipe post I can find from Old Chicago is for their Winter Chili, which is nothing like what they serve in their restaurant.  So yeah, I used what was given but totally bastardized the recipe since I cannot leave well enough alone.  It came out quite good!  I love the addition of bigger chunks of meat utilized in this recipe instead of just the regular ground beef we normally get with chili. 

But first, allow me to relay the adventure of shopping for ingredients.  Beer.  I had to it hunt down.  Unlike most people whom wake up for and fall asleep with beer, I am clueless.  Beer, lager, ale, stout, amber?  Whah?!?  After stalking the wall of liquor at my local Albertson's I grabbed a German variety with a picture of a girl on it.  If its a German beer with a buxom maiden on it, then it must be good, right?  Consider my beer shopping done.

Next up, flank steak.  Huh?  In chili?  Okay, I've heard of flank steak, but nothing I am looking at in the meat cooler says flank steak.  I see all kinds of words to describe various types of meat/steak, but nothing that says "flank steak" specifically.  Time to phone a friend.  Bettina, who is in the restaurant industry, thinks it must be a tough meat so she suggested I get a comparable tough meat as it probably requires a long cooking time.  Sounds good to me.  I picked up some part of a beef shoulder or something like that.

Okay, so by now I realize I am not quite the cook I tell people.  Sure I've got some amazing meals up my sleeves, but if I had to cook with beer or big chunks of meat, I am lost.  You'd think all that Food Network watching would have taught me something.  In my defense, if I had to cook with alcohol, it is normally wine, never beer.  Not saying I'm a wine connoisseur, but if it is called for in a recipe, I can usually find a bottle of pinot grigio or cabernet sauvignon.  What can I say?  I'm not as sophisticated as I pretend.

Below is the modified recipe I came up with.  Please, please, please do not triple the recipe unless you are feeding a million people.  Don't ask me how I know.


Chunky Chili  
Adapted from Old Chicago's Winter Chili
Yields: 16 servings

6 tbsp oil (I used bacon grease because everyone knows bacon is mmmmm!)
1 medium sized yellow onion, chopped
1 poblano pepper,diced
1 green bell pepper, chopped
1 1/2 lbs ground chili beef (I found this bigger ground at a Mexican grocer)
1 lb steak (thinly sliced beef shoulder or sirloin tip steak), cut into half inch pieces
2 tbsp chili seasoning
1 tsp dried oregano
2 tsp cumin
½ tbsp smoked paprika
2 tbsp garlic, minced
3.5 oz can chipotle pepper in adobo, pureed (use ¼ cup for less heat)
2 small cubes of beef bouillon
1 (12 oz)  bottle lager
3 (14 ½ ounce) cans fire roasted tomatoes
1 (6 oz) can tomato paste
1 (15 oz) can black beans, rinsed
1 (15 oz) can red or kidney beans, rinsed
water as needed, optional
1 1/2 -3 tsp Kosher salt
1 tsp freshly ground pepper

Toppings:
Sour cream
Shredded Cheddar Cheese
Diced red onion

1.  In a large pot, add oil, onions, poblano and green peppers. Sauté for 2 minutes or until onions are translucent.
2.  Add ground beef, cubed steak, chili seasoning, oregano, cumin, smoked paprika, garlic, and chipotle puree.
3.  When meat is browned, add beef bouillon and beer. Stir well.
4.  Add tomatoes, tomato paste, beans, and water (optional). Stir well and let simmer for 1 ½ to 2 hours. Stir occasionally.  Add more water as needed.
5.  Add 1 1/2 tsp salt and pepper, more if desired.
6.  Serve hot in bowl with sour cream, cheese, and onion.


Note:  
I did not add the toppings listed to my chili mainly because I am currently shunning all dairy products.  Oh, but how I miss cheese. 

Monday, January 23, 2012

kreating kefir

A few years ago while researching beneficial gut bacteria, I became interested in fermented foods.  I started making my own yogurt, kefir, kimchi, etc.  At the time, kefir was one of the most exotic and interesting fermented foods/drinks to pique my curiosity.  I had never heard of it, much less try it.

Curiosity got the better of me and I ended up ordering some kefir grains from eBay.  I received maybe a teaspoonful of kefir in the mail and feared I was duped. Alas, my fears were unrealized when within a month or so, my grains started multiplying like rabbits.  I can say without hesitation, fresh kefir is not the easiest thing to swallow, especially if it is left to ferment for longer periods.  The smell (yeasty), taste (tart/sour), texture (can be lumpy), etc., of kefir is not for the weak of stomach.  I can state unequivocally, it can be both foul smelling and tasting.  It took a week or two of daily gagging before I can get this stuff to go down without issues.  In a smoothie, loaded with frozen fruit and other goodies, it is quite fabulous!

As far as my digestive health, I cannot say that it has noticeably improved, but I can definitely say kefir has left me intrigued enough to pursue more information on intestinal well being. I truly believe antibiotics use can devastate your intestinal environment, creating an imbalance that may be very difficult, if not impossible to fix. From what I have read, fermentation may be part of the cure.  So let's bring on those good gut bacterias!

***Advance apologies on the lighting in these pictures.  I had taken the pictures over two days and one of the days was a bit overcast, therefore the yellow tinge to my pictures.***

What does kefir look like?  Have a gander at my milk kefir grains.  They look similar to cauliflower, don't they?  Only difference is, cauliflower is not slimy. 


Here are the grains added to milk.  Notice how they float near the surface.


My grains doing their thing.  See the coagulation going on?  It should look similar to buttermilk at this point.  Some people prefer to drink it at this stage.


And here is what it looks like when it is done (or rather overdone in my case).  I let the milk ferment a wee bit too long, therefore the stark contrast between the separation of the curds and whey.  No big deal, it just makes the solid portion thicker.  It will, however, be lumpier/grainier in texture, yeastier to the nostrils, and much more sour to the taste buds.


Interested in making your own kefir at home? Here are the things you will need:

     1 tsp of healthy milk/dairy kefir grains
     1 cup of whole milk, more as needed (you can use 2% but it will be less creamy)
     a large mouth glass jar with lid (at least 2-cup capacity)
     a plastic or wooden spoon
     a plastic sieve or strainer with small holes (reactive metals can harm grains)


 Instructions on how to ferment your kefir:
  1. Put your grains into a sieve and rinse slowly with about a quarter cup or more of whole milk.  This will help get rid of some of the sludge that adheres to the kefir grains.  This mucous-y slime is called kefiran and is actually good for your grains. I just think it's a good idea to rinse the grains when you first get them as you can never be sure of the cleanliness of your source.  Once rinsed, dump your grains in to a clean glass jar.
  2. Fill the jar with a half cup of whole milk.  Lay the lid over the top of the jar's mouth, but do not tighten it.  This keeps the dust out but also allows the kefir to breathe and grow.  Allow the jar to sit on the counter away from direct sunlight.  
  3. About 2-3 times a day, agitate the jar or stir the milk with a plastic spoon.  Continue to do this everyday until the liquid thickens.  It may take up to 3 days or longer to thicken the first batch.
  4. Once it has thicken, dump out the content into your sieve and rinse with fresh milk. 
  5. Add the grains back into the glass jar (don't need to clean it), and add half a cup of fresh milk. 
  6. Continue this process for your first 3 batches over the course of 1 to 2 weeks.  It is optional to rinse your grains after this.
  7. At this point, you should have legitimate kefir.  Some people like to remove the grains when the milk has thickened to a buttermilk consistency while others let it ferment until the milk separates into curds and whey.  The longer you let it ferment, the stronger the smell and taste.  Note that the amount of milk can be incrementally increased as your grains become more active.  In the beginning, it might take longer to make kefir, but before the month is up, you will be up to your neck in kefir. 

Things of note:
  1. The amount of kefir grains used, the amount of milk used, and the temperature will affect the rate at which your grains multiply.   Adjust accordingly.  I've also noticed that if the grains are not rinsed or the bottle is not cleaned each time, the grains will multiply quicker.
  2. Do not fill your milk to the top of the jar because kefir needs room to grow.  Fill your jar only 4/5ths full.   
  3. If you get a yellowish film at the top of your kefir and it does not appear to be thriving, it's probably because you are not agitating the jar enough.  Unlike yogurt, kefir likes to be moved around while it is fermenting.  Just stir and this will most likely fix your problem.
  4. Remember, the grains will create a slimy coating.  It's gross, but normal, and actually a good sign of healthy grains.
  5. The longer fermentation will create a little bit of alcohol, so the fizzing sound you hear is just your kefir talking to you.
  6. You can eat the excess kefir grains.  They are rather spongy and chewy in texture.
  7.  If not consuming right away, store the finished kefir in the fridge.  It should keep indefinitely.  But try to use it within a couple of weeks.  Drink it straight or make delicious smoothies with frozen fruit.
  8.  If you want to take a break from kefir'ing, rinse off your grains with fresh milk and put them in a clean glass jar.  Add milk, and store in the fridge.  I have stored them this way for about 1 1/2  months.  I cycle the grains through, where every month or so, they are stored in the fridge, then they come out to do their kefiring job for a week or two and then back to the fridge again.

Monday, January 16, 2012

chew your cud

I was not interested in cooking growing up.  My mother never taught me, but she did let me do all the mundane stuff such as washing, peeling, chopping vegetables, etc.  It wasn't until I was in my mid 20s, living on my own, and tired of eating out for every meal that my love affair with cooking began.  I am by no means an intuitive cook.  Back then, my thought process goes something like this, "If garlic and chocolate are both good, then they must be great together!"  Yeah.  Scary.  Fortunately my love of eating kept me on my culinary quest for better tasting food, and I have gained much knowledge and amassed a few great recipes from this adventure. 

Not too long ago, I had informed my sister-in-law (SIL) that I want to try and make five good meals from every major country.  I was most comfortable with Italian or Mediterranean types of meals and wanted to spread my culinary wings.  I challenged myself last year to do Indian since it required using exotic spices and cooking techniques that I am not familiar with.  Recently, I also attempted Mexican or South American fares, since I was never a big fan (blasphemous for someone living in Dallas, I know).  So far, my south of the border dishes are coming out quite tasty, but my Indian ones are rather disappointing, especially with a pantry full of Indian spices and herbs at my disposal.  But I continue to chug along on my quest for good eats.  Below are some dishes I made recently.

Last week, Coriander Chicken from the Savoring the Spice Coast of India cookbook was on my menu.  I have made about three recipes from this book and for some reason, they all taste the same to me.  I expect so much more flavor, something akin to this Pakistani Chicken Jalfrezi recipe (will post my version next time I make it).  Although one can typically lay the fault at my door, as I like to bastardize my recipes, I can say with certainty this recipe was not altered.  It was just okay tasting like the Peppery Chicken Curry recipe I also tried from this book.  Don't get me wrong, neither dish was bad, they just needed more flavor. I think it's time to say adieu to this Kerala (South Indian) cookbook and try a couple of others I have waiting in the wings.  Maybe go for a more Northern flair?  We'll see.

Here is the recipe of the Coriander Chicken I've been eating.  It was my first attempt at using fresh curry leaves and I had to hunt these down at a nearby Indian grocer.  It is my understanding that unlike bay leaves, curry leaves are edible.  I didn't eat them because they reminded me too much of bay leaves and therefore could not get myself to hack any down.


Coriander Chicken (Mali Char)
From Savoring the Spice Coast of India
Serves:  6

4 tbsp vegetable oil
2 cups thinly sliced onion
2 tsp minced garlic
2 tsp minced ginger
1 tsp minced fresh green chili (serrano or Thai)
10-12 fresh curry leaves

Ground masala
6 tsp coriander
1 tsp black pepper
1/2 tsp cayenne
1/4 tsp turmeric
1/8 tsp cinnamon
1/8 tsp clove
1/8 tsp cardamom

1 1/2 tsp salt
2 lbs boneless skinless chicken breasts, trimmed and cut into 1-inch cubes
1/2 cup canned coconut milk
1/4 cup chopped fresh cilantro, plus additional leaves for garnishing

1.  In a large deep pan heat the oil over medium-high heat.  Saute the onions until the edges are nicely browned.  Add the garlic, ginger, green chili, and curry leaves and fry for 1 minute.
2.  Stir in the ground masala, salt, and a few teaspoons of water to prevent the spices from sticking.  Fry for 2 minutes, stirring constantly.
3.  Put in the chicken pieces and continue stirring over medium-high heat until the pink color disappears.  Add 1/4 cup of the coconut milk and 1/2 cup water and bring to a boil.  Reduce the heat and simmer, covered, for 20 minutes.
4.  Add the remaining 1/4 cup coconut milk and chopped cilantro, bring to a boil and remove from heat.  check the salt.  Garnish with fresh cilantro leaves and serve immediately.

hola, pollo (hey, Spanish is not my first, second, or third language, okay?  LOL!)

I also made a dish from south of the border called Pollo en Pipian.  I actually really like this dish.  It's very different and I would guess it has Spanish origins with the capers and olives in it.  Unfortunately, the color of the finished dish is not all that appetizing.  Beige never is.  I had to doctor it with a few bits of green that one typically does not see in the dish.  The herb loving person in me added cilantro, scallions, and a squeeze of key lime to give it a bit more oomph.  I figured avocados didn't hurt either, especially since I have about 5 sitting around waiting to be used.  I think it brightened the dish and made it even tastier.  Unfortunately, I did not take pictures with the additional ingredients in my dish.


Pollo en Pipian (Chicken in Pipian Sauce)
From Allrecipes.com
Serves: 8

1 (3 pound) chicken, cut into parts
3 cups water
2 stalks celery
1 bay leaf, crumbled
1 onion, quartered
2 cloves garlic
2 tsp salt
2 tsp black pepper

Sauce:
1/2 cup blanched almonds
2/3 cup sesame seeds
1 tbsp extra virgin olive oil
2 tsp chicken bouillon
3 quero chile peppers, chopped
2 jalapeno peppers, chopped
1/3 cup pitted black olives
2 tsp capers

1.  In a large saucepan, combine chicken, water, celery, bay leaf, onion, and garlic.  Season with salt and pepper.  Cook until chicken is cooked through and tender.  Strain, reserving the broth.  Skin the and bone the chicken set the meat aside.
2.  Toast the sesame seeds lightly in a skillet, stirring constantly, until they are fragrant.  In a food processor or blender, puree the sesame seeds and almonds with 1 cup of the reserved chicken broth.
3.  Heat oil in a skillet over medium low heat.  Add the blended sesame seed and almond mixture, and cook for 5 to 8 minutes, or until thickened.  Stir in 1 to 2 cups reserved chicken broth and chicken bouillon.  Simmer for 5 minutes.  Stir the chopped peppers, olives, capers, and chicken.  Simmer for 10 minutes, and serve hot.

My changes:
Use rotisserie chicken in lieu of purchasing a raw chicken.  Shred the rotisserie chicken for use in step 3.  Use remaining skin and bones to make broth in step 1.  Anymore, when chicken broth or stock is called for, I reach for the carcass of a rotisserie chicken.  It adds a beautiful depth of flavor that you cannot get with just a raw chicken.  Do not choose a flavored rotisserie chicken (i.e. BBQ, Cajun, etc.), as that will affect the outcome.  Finish off the dish with chopped cilantro, chopped scallions, sliced avocados, and a squeeze of lime.

***Sorry the pictures are so blurry.  I am obviously not a photographer and have been rather challenged by getting the right lighting and close-up pictures for my blog.  Never mind setting up the food so it would look more appetizing.  Unfortunately, these challenges have delayed or prevented me from updating my blog more often.  I'll keep trying, though.

Sunday, January 15, 2012

kolor your kowlicks

About a year ago I realized I was losing the fight with Father Time.  My dark locks had a patch of rather unruly gray that, if left alone, would definitely rival that of Pepe Le Pew.  I knew I was not going to be one of those lucky few to sport the distinguishing salt and pepper - much less the Silver Fox - look.

I broke down and decided to color my hair.  After a bit of research on the Internet and a detailed conversation with an Indian friend, I decided I want to try my hand at henna.  Millions of Indian women have done it forever and it is supposed to be healthy for one's hair.

The first time I tried it, I was not impressed.  It took THREE hours to set.  It is also extremely messy!  By the time I finished, not only was my hair colored, but so were my scalp (for days!), ears, neck, anywhere it touched my skin, bathroom counter, bathroom door, etc.  You name it; it got henna'ed.  My hair also emitted a rather unpleasant odor for over a week.

However, I kept at it monthly and by about the third month, the time and mess didn't bother me as much.  I don't know that my hair is as healthy as all the claims made for henna, but it didn't appear to hurt it.  My friends say they like the color and that my hair looks shinier (which equates to healthier, I guess).  The color is subtle, which I like, unless I am in bright or direct sunlight, which I hate.  With all that said, let's see how this process is done, eh?

Here are the items you will need to henna your hair:

     1 box or package of henna (about 5-6.5 oz)
     1 lemon, juiced
     1 1/2 - 2 cups of strong coffee or espresso, lukewarm or cold is fine
     a ceramic bowl, big enough to hold about 4 cups
     a sturdy wooden spoon or stick
     a pair of fitted, disposable gloves
     a plastic shower cap (see note below on the grocery bag)
     a dark, damp face towel for wiping henna goo off forehead, ears, etc.

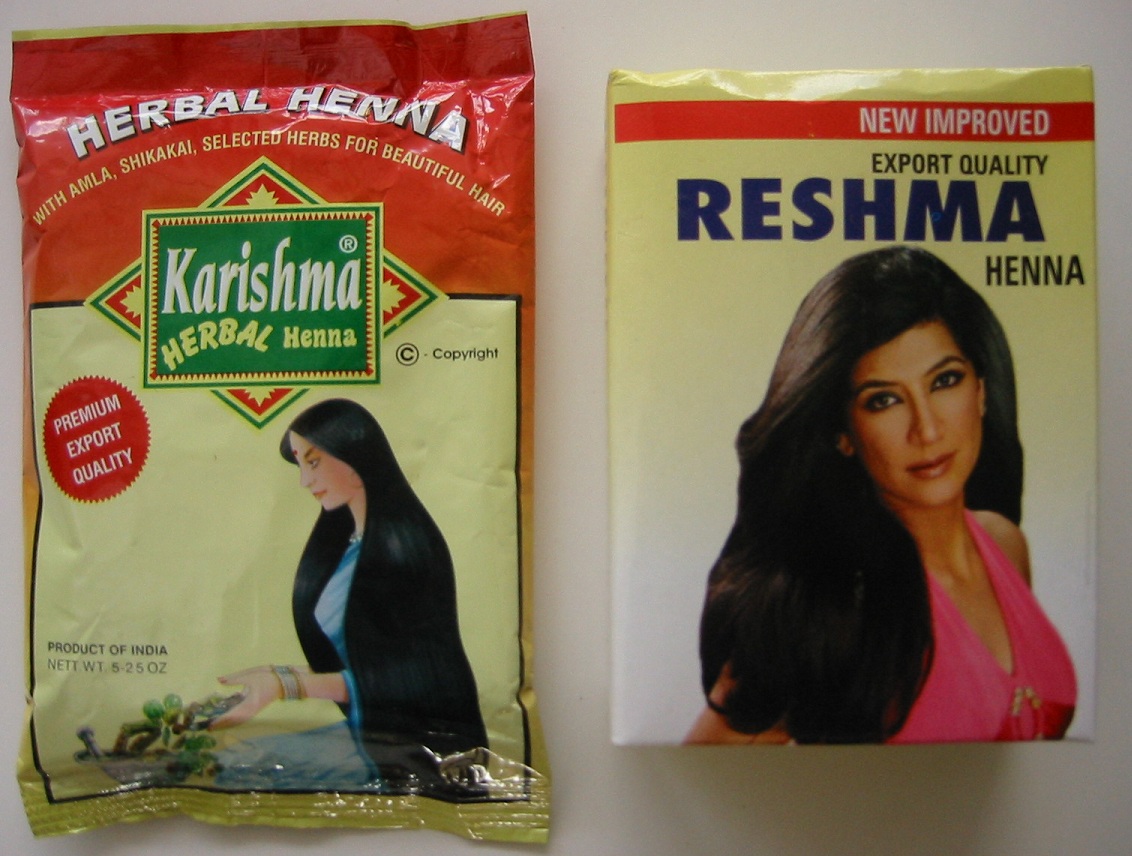
First, get thyself to an Indian grocery store and look for some packages of henna.  There are about 3-5 brands to choose from, around $3 each.  My good friend, Pratima, recommended getting one with herbal henna in it, such as the Karishma package on the left.


As you can see, there are instructions on the back of the Karishma package.  I do not follow the instructions as written, though.


Here are the contents of the Karishma package emptied out into a bowl.  I try to stick with glazed ceramic bowls as opposed to the iron bowl mentioned on the back of the package.  Just the idea that putting the henna powder in to an iron bowl creates a reaction squicks me out.  I fear toxic chemicals leached from the bowls will be absorbed into my skin. 


Add the juice of one lemon and about 1 1/2 cups of very strong coffee.  Using a wooden spoon, stir until the mixture is incorporated, add the additional 1/2 cup of coffee if needed.  The consistency should be that of boxed brownie or cake mix when done.  It will still be a bit lumpy, but do not worry.  Just cover with saran wrap and let sit for several hours or over night. 


Using disposable plastic gloves, apply the goo to your hair in sections.  I start at the front, near my forehead and work back, taking about 1x3 inch sections at a time.  Smear it all on my hair, making sure everything is covered, especially your roots.  Cover your hair with a shower cap or a plastic bag.  After three hours, rinse under lots of running water.

A few more tips I found helpful:
  1. Consider doing this on a Friday night so you won't go into work with tinted scalp, hands, etc.
  2. Wear dark, old shirts and pants.
  3. Cover your shoulders with a plastic grocery sack that is torn down the middle front. 
  4. When done applying goo, use the same grocery sack to cover your head like a shower cap.  Tie where needed to ensure a good fit.  Toss when done. 
  5. You can use espresso, coffee, and/or tea to get slightly different tints.  I use espresso or coffee, my friend combines coffee and tea in her henna mixture.  Note that espresso will most likely stain your skin darker and the rinse water for your hair will take about a week or more to run clear (coffee or tea will probably take about 4-5 days to rinse clear).
  6. If there is carpeting in your bathroom, remove or cover it.
  7. When rinsing your hair the first time, be aware there will be chunks of goop coming off that may stain your shower curtain.  Bend down as close to the drain as possible to get the goop off first.  Once the henna chunks are off, then you can shower as usual.
  8. Remember your hair will not smell good for 1 to 2 weeks, the mixture of coffee and henna is a not very appealing. 
  9. Don't panic if the color is more brilliant the first three days, it will tone down.
  10. If you have a lot of gray hair, then this will leave you with a vibrant head of bright reddish/orangish hair.  Not my thing, but whatever floats your boat.  
Here is something I do prior to applying the henna:  I rinse my hair in a mixture of 1 part apple cider vinegar to 3 parts water.  Vinegar cleans out the build-up of hair products.  I use apple cider vinegar that still has the "mother" in it.  Sludge at the bottom of the vinegar bottle is indicative of the presence of the "mother". Stay away from the super clear apple cider vinegar.  Just make sure not to get the vinegar rinse in your eyes or it will sting.  Remember the vinegar will smell bad when wet, but should be okay when dry.  When hair is about dry, begin the henna routine.  You can also rinse with this vinegar solution once a week.

Here's to thumbing our noses at Father Time.  Hope you have fun koloring your kowlicks.  Enjoy!